
In the third parts of this platforming series, we will learn about parallax background, enemy behavior and adding explosion.
[divider]
Tutorial Information
- Difficulty: Beginner
- Platform used: Construct 2 (version r114)
- Estimated completion time: 2 hours
- Advanced requirement: Patience
[divider]
Build platforming game from scratch Series
- Part 1: Creating player and tiled platform
- Part 2: Creating token and game HUD.
- Part 3: Parallax BG and Enemy AI
[divider]
Part 3 Demo

[divider]
Assets Download
Graphic Assets
[wpdm_file id=19]
Project Base
[wpdm_file id=17]
Notes:
- I am the author of these graphic. Please contact me if you want to use this in any other project.
- If you have demand for graphic, I am open for commission. Contact me for more info.
[divider]
Step 1:
First let’s make our background parallax scrolling.
- Click on the BG Layer in Layers panel.
- Unlock BG Layer.
- In the Properties panel (make sure it is displaying the properties of BG Layer), set Parallax value to 50, 100; and set Parallax in editor to YES.
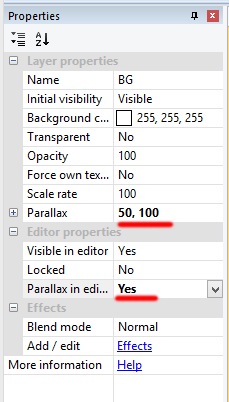
It means the BG layer will horizontally-move slower then the other layers by 50%, and vertical-move together with the other layers.
Now delete all the background in Layer BG, cuz we are going to use something more convenient to create tiled background.
Double-click in the space of the scene, to add a new object.
Click Tiled Background in the popup window/ Insert.
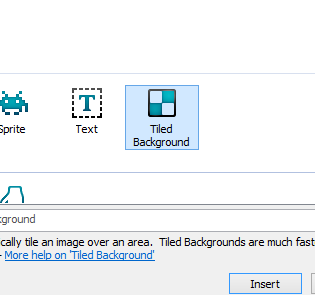
Click the 0,0 position on scene.
Browse to the background image included in assets downloaded file (BG.png) in Image edit window.
Close Image edit window.
Resize the this TiledBackground object until it cover all the scene.
Click play to see the parallax effect.
[divider]
Step 2:
Now we start spawning enemy.
- Lock BG layer and click GameObjects layer in the Layers panel.
- Double-click on the space of the scene.
- Pick Sprite/Insert.
- Double-click the sprite we just created.
- Right-click in the Animation Frames window and pick Import Frames….
- Browse to and select all the Enemy Frames/ Open.
- Delete the first empty frame by right click it and click delete.
- Modify the Default Animation Properties in the Properties Panel to 16 Speed and Yes for Loop.
- Close Edit Image window.
- In Projects Panel, edit its name from Sprite to Enemy.

Now we got a very big squid on the scene. Re-size it until it fit into 1 cell of the Ground.

[divider]
Step 3:
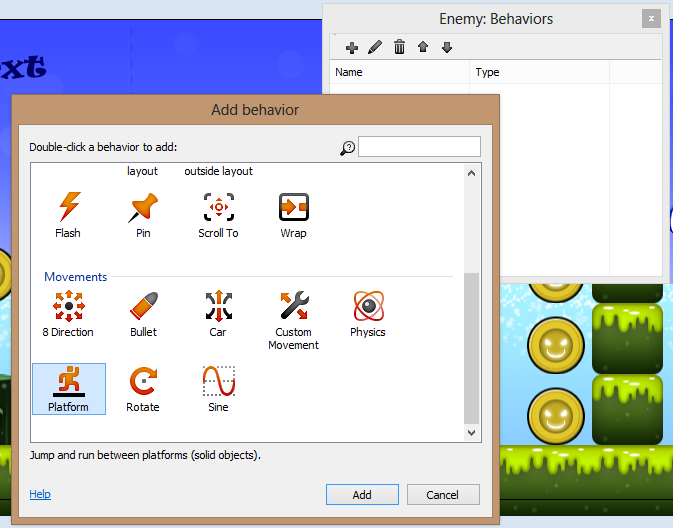
Let’s add behavior to the enemy in order to have it running around. 🙂
- Right-click the Enemy in Projects Panel/ Behavior…
- Add Platform Behavior to it.
- With Enemy is still selected, go to Properties panel and modify Max Speed to 100 and Default controls to No. (to prevent getting controlled by keyboard)
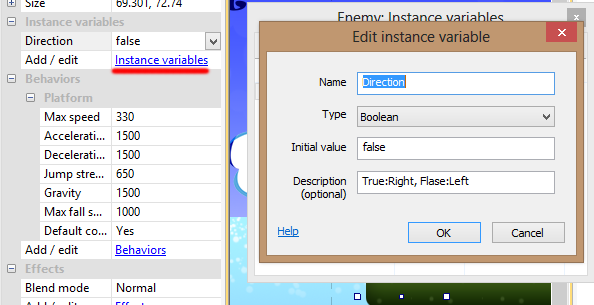
- Add 1 instance variable to it by click Instance variables.
- Click add and fill in following information – Name:Direction – Type:Boolean – Initial value:false – Description:True:Right, Flase:Left.
- Click OK.
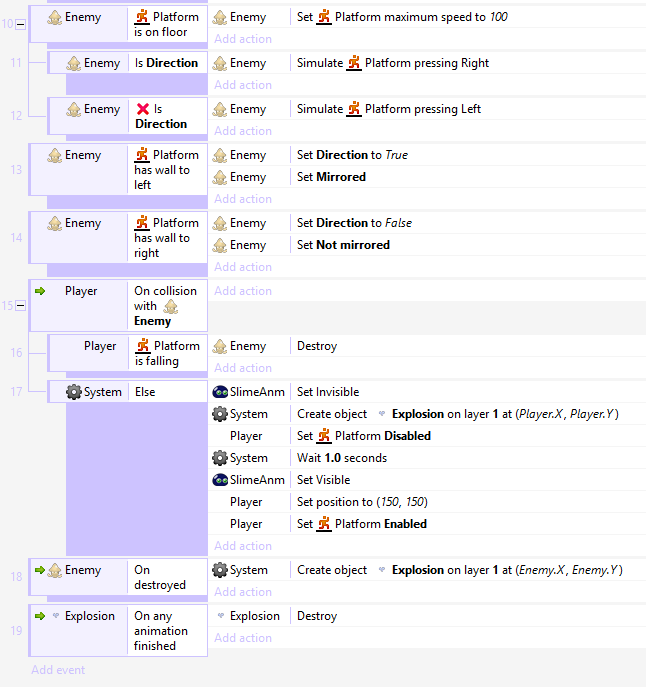
Now go to Event Sheets Tab and add the following events and actions.
Event Condition:
- click Add Event.
- Click Enemy in the first pop-up window.
- Click is on floor in the next pop-up window.
- then Done.
Action Perform:
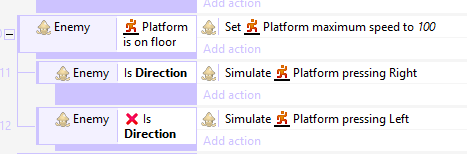
- Click Add action next to the Platform is on floor event.
- Pick Enemy then next.
- Find Set max speed action, fill 100 in Max Speed row, then Done.
2 Sub Events:
1. Event Condition:
- Right click in Event 10 (the just created event), pick Add/ Add Sub-event
- Click Enemy in the first pop-up window.
- Click is Boolean instance variable set in the next pop-up window.
- The instance variable should show Direction variable.
- then Done.

Action Perform:
- Click Add action next to the Is Direction event.(means When Direction value is true)
- Pick Enemy then next.
- Find Simulate Control action, pick Right in Control dropdown, then Done.
2. Event Condition:
- Right click in Event 10 (the just created event), pick Add/ Add Sub-event
- Click Enemy in the first pop-up window.
- Click is Boolean instance variable set in the next pop-up window.
- The instance variable should show Direction variable.
- then Done.
- Right-click this event and click Invert.
Action Perform:
- Click Add action next to the X Is Direction event.(means When Direction value is false)
- Pick Enemy then next.
- Find Simulate Control action, pick Left in Control dropdown, then Done.
Now depend on either true or false of Direction variable, our enemy will move to the left or right. Press Play to test the simulation.
In case the squid in not moving, you may check whether it is stuck between the ground by drag it out of the tunnel to somewhere more free space, or re-size it to be smaller also one way to test the problem.
Now the problem is that the squid will not turn around when it hits the wall. Go to Events sheet and add this behavior.
Event Condition:
- click Add Event.
- Click Enemy in the first pop-up window.
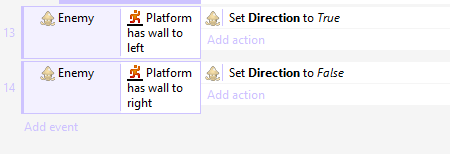
- Click is by wall in the next pop-up window.
- Select Left from the dropdown.
- then Done.
Action Perform:
- Click Add action next to the Platform has wall to left event.
- Pick Enemy then next.
- Find Set boolean action.
- Select Direction for Instance variable and True for Value, then Done.
Event Condition:
- click Add Event.
- Click Enemy in the first pop-up window.
- Click is by wall in the next pop-up window.
- Select Right from the dropdown.
- then Done.
Action Perform:
- Click Add action next to the Platform has wall to right event.
- Pick Enemy then next.
- Find Set boolean action.
- Select Direction for Instance variable and False for Value, then Done.
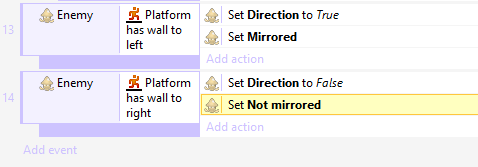
Click Play (Run Layout), the Squid now should turn around when getting collided with the wall. But we still need to flip the animation at the same time also. For these 2 events, add 2 more actions:
Action Perform:
- Click Add action next to the Platform has wall to left event.
- Pick Enemy then next.
- Find Set mirrored action.
- Select Mirrored for State, then Done.
Action Perform:
- Click Add action next to the Platform has wall to right event.
- Pick Enemy then next.
- Find Set mirrored action.
- Select Not mirrored for State, then Done.
Now the squid should be able to flip the animation along with the turn around action. OK, that’s all for this step.
Duplicate Enemy by Ctrl+Alt+Drag to have more enemies on scene. Don’t add too muuchh!! 🙂
[divider]
Step 4:
Now we will work on collision between player and enemy.
First let’s see how we want system to occur when player collides enemy.
In this game, I want that when the enemy will be killed if the slime jumps on it. (= when the slime is falling)
However, the slime will be killed if contact it will moving horizontally.
Go to Events sheet and add collision behavior.
Event Condition:
- click Add Event.
- Click Player in the first pop-up window.
- Click On collision with another object in the next pop-up window.
- Click <click to choose> and click Enemy sprite.
- then Done.
Sub-Event Condition:
- Right-click Player On collision with Enemy (the just created event), pick Add/ Add Sub-event
- Click Player in the first pop-up window.
- Click Is falling in the next pop-up window.
- then Done.
Action Perform:
- Click Add action next to the Platform is falling event.
- Pick Enemy then next.
- Find destroy action
- then Done.
Click Play (Run Layout) and see if you can kill the enemy or not. The player supports to pass through the enemy when moving and kill it when falling.
Now we want something happen when the player collides the enemy horizontally, or we can say collides the enemy when the Player is not falling. In the current event sheet, there is already the event Player is falling, so to reverse it, we can create a Else event on the Platform is falling event.
Else-Event Condition:
- Right-click Platform is falling (the just created event), pick Add/ Add ‘Else’
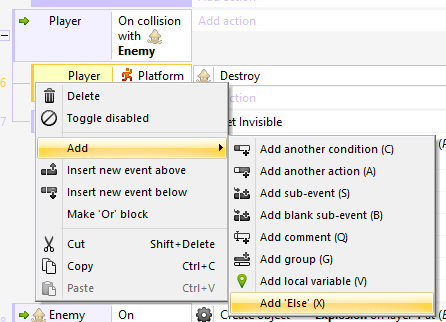
Now we should have another event called System Else below the Platform is falling event.
Currently, we don’t have health or life to the slime, therefore, I will temporary make that, when the slime dies, it will disappear, wait for 1 second then appear back in the beginning position.
So let’s add these actions to the System Else event.
Action Perform: (invisible)
- Click Add action next to the System Else event.
- Pick SlimeAnm then next.
- Find Set visible action/ Choose Invisible for Visibility row
- then Done.
Action Perform: (Disable Platform control)
- Click Add action next to the System Else event.
- Pick Player then next.
- Find Set enabled action/ Choose Disabled for State row
- then Done.
Action Perform: (Wait 1.0 seconds)
- Click Add action next to the System Else event.
- Pick System then next.
- Find Wait action/Fill 1.0 Second
- then Done.
Action Perform: (visible back)
- Click Add action next to the System Else event.
- Pick SlimeAnm then next.
- Find Set visible action/ Choose Visible for Visibility row
- then Done.
Action Perform: (respawn at beginning position)
- Click Add action next to the System Else event.
- Pick Player then next.
- Find Set position action/ Fill in 150 for X and 150 for Y
- then Done.
Action Perform: (enable Platform control)
- Click Add action next to the System Else event.
- Pick Player then next.
- Find Set enabled action/ Choose Enabled for State row
- then Done.
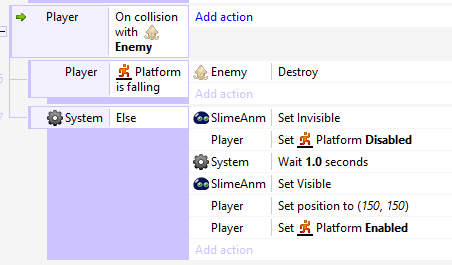
Click Play (Run Layout), the Player should return to beginning position when collided normally with the squid.
[divider]
Step 5:
Let’s add some fun explosions to scene 🙂
- Click GameObjects layer in the Layers panel to make sure you are working on it.
- Double-click on the space of the scene.
- Pick Sprite/Insert.
- Double-click the sprite we just created.
- Right-click in the Animation Frames window and pick Import Frames….
- Browse to and select all the Explosion Frames/ Open.
- Delete the first empty frame by right click it and click delete.
- Modify the Default Animation Properties in the Properties Panel to 16 Speed and No for Loop.
- Close Edit Image window.
- In Projects Panel, edit its name from Sprite to Explosion.
Notes:
- Drag Explosion object to somewhere out of the scene but don’t delete it, Construct 2 need a reference when it run the game.

First we when to add Explosion when the Enemy goes to heaven. So let’s add this event and action.
Event Condition:
- click Add Event.
- Click Enemy in the first pop-up window.
- Click on destroyed in the next pop-up window.
- then Done.
Action Perform:
- Click Add action next to the Enemy On destroyed event.
- Pick System then next.
- Find Create object action.
- Click <click to choose> and click Explosion sprite.
- Layer 1 (means GameObjects Layer)
- Enemy.X for X and Enemy.Y for Y (means explosion added at Enemy position)
- then Done.

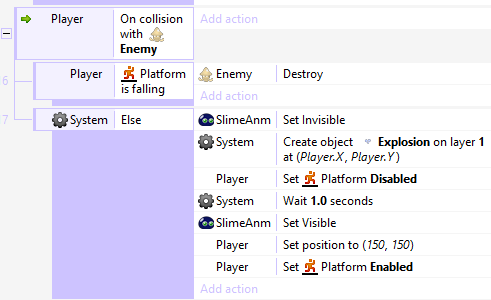
We also want explosion to be added when the Slime dies (T_T):
Action Perform:
- Click Add action next to the System Else event.
- Pick System then next.
- Find Create object action.
- Click <click to choose> and click Explosion sprite.
- Layer 1 (means GameObjects Layer)
- Player.X for X and Player.Y for Y (means explosion added at Player position)
- then Done.
Notes: if we leave it like this, the Explosion will appear when the Player already in the beginning position. We don’t want that, so drag the Create object Explosion up and place it between Set Invisible and Set Platform Disabled actions.
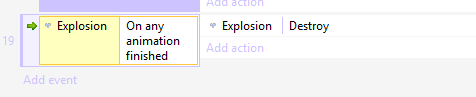
Click Play (Run Layout), the Explosion should appear correctly but it will not disappear when it finishes its animation. Therefore, we need to add 1 more Event and Action to the sheet (last one, I promise 🙂 )
Event Condition:
- click Add Event.
- Click Explosion in the first pop-up window.
- Click on any finished in the next pop-up window.
- then Done.
Action Perform:
- Click Add action next to the Explosion On any animation finished event.
- Pick Explosion then next.
- Find Destroy action.
- then Done.
Now run the game. Yay, you have finished today tutorial excellently. I expect nothing went wrong. If it did, please tell me by comment it below then I can improve the quality of my tutorial. Thanks for your help.
Today new Events:
[divider]
Download Final Files
[wpdm_file id=18]
[divider]
Part 4 Teaser:
- Game Scenes.